How to Shoot in Low Light Without Flash
Practical techniques for sharp, clean low-light photos without flash, covering high ISO, fast lenses, stabilization, and noise reduction.
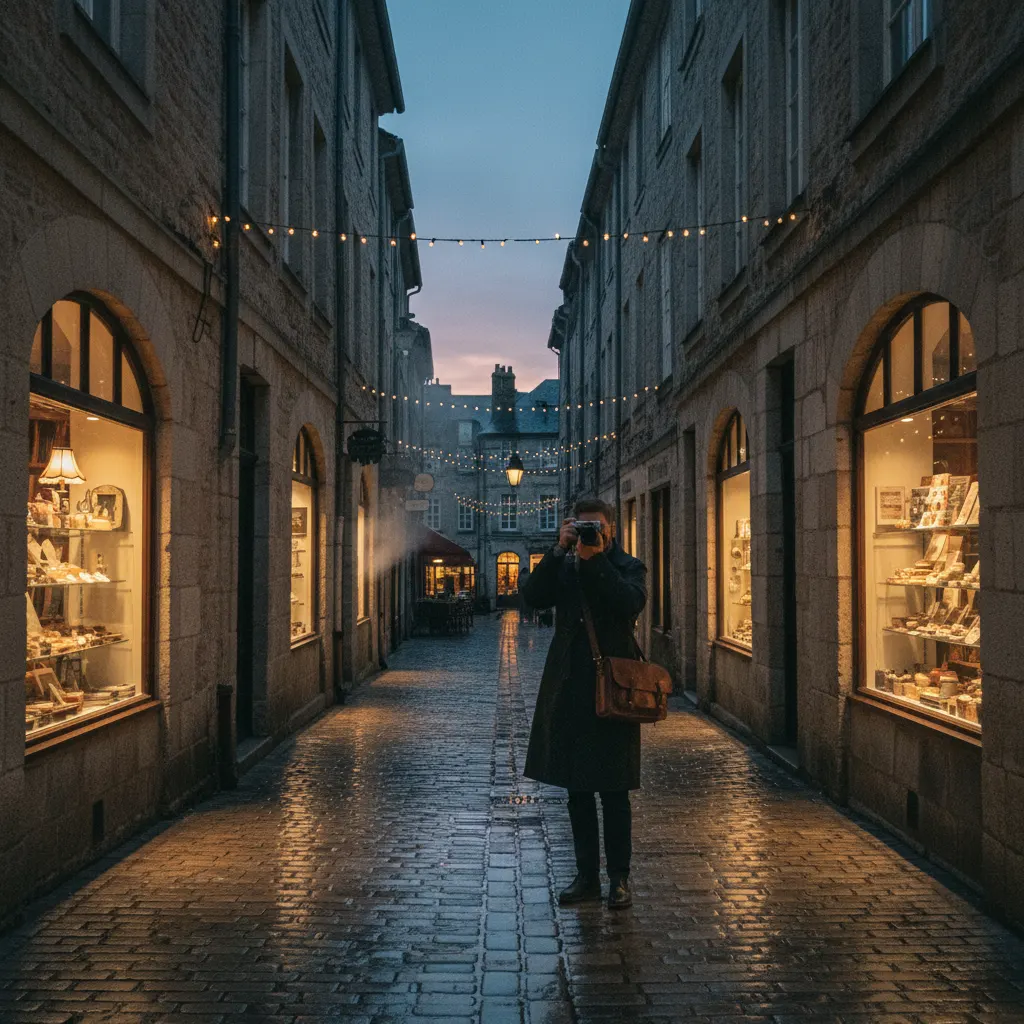
Flash kills the mood. The warm glow of a restaurant, the intimacy of a concert, the drama of a dimly lit street — all of it disappears under the harsh blast of a flash. Fortunately, modern cameras are capable of producing excellent images in remarkably low light without any artificial lighting. Here is how to get the most out of those dark situations.
The Low Light Exposure Challenge
In low light, your camera has less light to work with. The three exposure variables — aperture, shutter speed, and ISO — are all pushed to their limits:
- You need a wide aperture to gather maximum light.
- You need a slow enough shutter speed to let in sufficient light, but fast enough to avoid blur.
- You need a high enough ISO to brighten the image, but not so high that noise destroys detail.
Balancing these three factors is the core challenge of low-light photography. For a full breakdown of how these settings work together, see our guide on understanding aperture, shutter speed, and ISO.
Step 1: Use the Widest Aperture Available
Open your lens to its maximum aperture. This is the single most effective way to gather more light.
The difference between lens speeds is dramatic:
| Aperture | Light Compared to f/5.6 |
|---|---|
| f/5.6 | 1x (baseline) |
| f/4 | 2x more light |
| f/2.8 | 4x more light |
| f/2 | 8x more light |
| f/1.8 | ~10x more light |
| f/1.4 | 16x more light |
An f/1.4 lens lets in 16 times more light than an f/5.6 kit lens. That translates directly into lower ISO or faster shutter speeds — or both. The wide aperture also produces beautiful bokeh that separates your subject from dark backgrounds.
The Best Low-Light Lenses
- 50mm f/1.8 — Available from every major brand for $100 to $250. The cheapest and most impactful low-light upgrade you can buy.
- 35mm f/1.4 — Excellent for street and environmental portraits.
- 85mm f/1.8 — Ideal for portraits and events in dim venues.
- 24mm f/1.4 — Wide-angle option for interiors and astrophotography.
- Sigma 30mm f/1.4 (APS-C) — Outstanding value for crop sensor cameras.
If you regularly shoot in low light, a fast prime lens should be your next purchase. Many of these primes also double as excellent portrait lenses — see our guide to the best camera lenses for portraits for detailed recommendations.
Step 2: Manage Your Shutter Speed
The minimum shutter speed you can use handheld depends on your focal length and whether your camera or lens has stabilization.
The Reciprocal Rule
Without stabilization, your minimum shutter speed should be at least 1/(focal length). For a 50mm lens, that is 1/50s. For a 200mm lens, 1/200s. On a crop sensor camera, multiply the focal length by the crop factor first (1.5x for APS-C, 2x for Micro Four Thirds).
With Stabilization
Image stabilization (IS, VR, OIS, IBIS — depending on the brand) allows slower shutter speeds while keeping the image sharp. Modern in-body stabilization (IBIS) can buy you 5 to 7 stops, meaning a 50mm lens can potentially be shot at 1/2s handheld and still produce a sharp image of a static subject.
Practical limits with stabilization:
- Stationary subjects: 1/8s to 1/2s is achievable with practice and good technique.
- Slow-moving subjects: 1/30s to 1/60s.
- Fast-moving subjects: Stabilization does not help. You still need a fast shutter speed to freeze subject motion.
Steady Shooting Technique
Even with stabilization, good technique matters:
- Tuck your elbows against your body.
- Brace against a wall, post, or railing.
- Exhale slowly and press the shutter gently between heartbeats.
- Use burst mode — even at slow shutter speeds, the middle frames in a burst tend to be sharper than the first or last.
Step 3: Push Your ISO
If you have opened the aperture wide and slowed the shutter speed as far as you safely can, raise the ISO to properly expose the image.
How High Can You Go?
This depends entirely on your camera. Here are general guidelines for modern cameras (2020 and newer):
| Camera Type | Usable ISO Range |
|---|---|
| Full-frame mirrorless (Sony A7 IV, Nikon Z6 III, Canon R6) | Up to ISO 12800, often ISO 25600 |
| APS-C mirrorless (Fujifilm X-T5, Sony A6700) | Up to ISO 6400, sometimes ISO 12800 |
| Micro Four Thirds (OM System, Panasonic) | Up to ISO 3200, sometimes ISO 6400 |
| Older DSLRs | Up to ISO 3200 to 6400 |
| Smartphones | Up to ISO 800 to 1600 |
These are conservative estimates for printable results. For social media, where images are viewed small, you can often push one to two stops higher.
Auto ISO Strategy
Auto ISO is extremely useful in low light. Set it up properly:
- Set a minimum shutter speed (e.g., 1/60s for general shooting, 1/250s for action).
- Set a maximum ISO (e.g., ISO 6400 or ISO 12800 depending on your camera).
- Shoot in Aperture Priority with the lens wide open.
The camera will use the lowest ISO possible while maintaining your minimum shutter speed. If the light drops, it raises ISO automatically until it hits your ceiling. This is the most efficient low-light shooting mode for unpredictable situations. If you want full creative control over every parameter, our guide on how to use manual mode on your camera walks you through the process step by step.
Step 4: Use Available Light Creatively
Low light does not mean no light. Learn to find and use whatever light exists in the scene.
Window Light
Indoors, position subjects near windows. Window light is soft, directional, and flattering — essentially a giant softbox. Even on an overcast day, a window provides ample light for portraits at reasonable ISO values.
Street Lights and Neon Signs
Urban environments are rich with artificial light sources. Position your subject under a street lamp, next to a shop window, or near neon signage. The light may be warm or cool, hard or soft — use it as part of the atmosphere.
Candles and Practical Lights
Restaurants, cafes, and homes often have warm practical lighting — candles, lamps, string lights. These are dim but atmospheric. Use them at close range for moody portraits and still life. White balance set to Tungsten or about 3200K will render these scenes naturally.
Reflective Surfaces
Wet pavement, puddles, glass buildings, and metallic surfaces all reflect and multiply existing light. After rain, a city street becomes twice as bright and infinitely more photogenic.
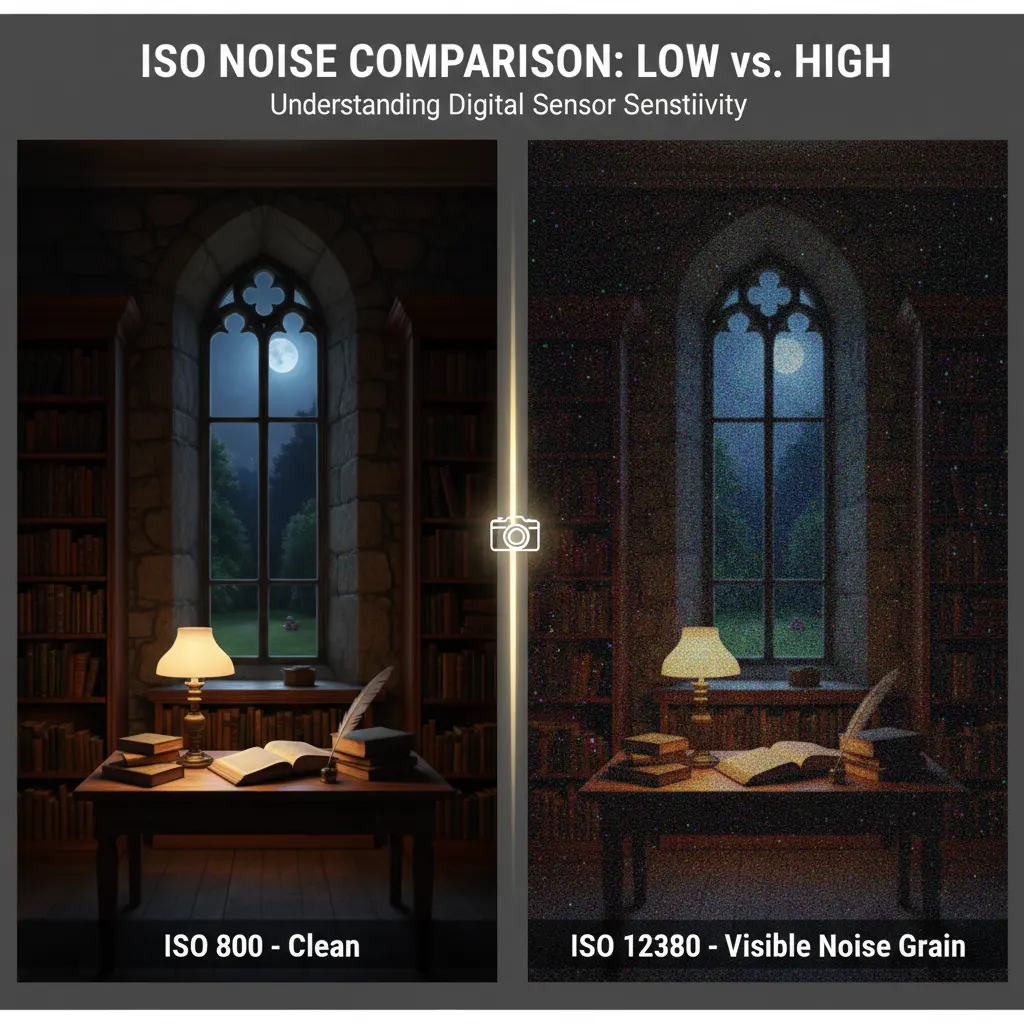
Noise Reduction in Post-Processing
Even with the best technique, high-ISO images will have noise. Modern software handles this remarkably well.
In-Camera Noise Reduction
Most cameras offer high-ISO noise reduction in their menu. Set it to “Normal” or “Low” for JPEGs. If you shoot RAW (which you should in low light), this setting has no effect — noise reduction is applied in post instead.
Software Options
- Adobe Lightroom AI Denoise — Select a RAW file, go to Photo > Enhance > Denoise. The results are exceptional, recovering detail that traditional noise reduction smooths away. This is the current gold standard.
- Topaz Photo AI — Standalone or plugin. Excellent noise reduction with AI-powered detail preservation.
- DxO PureRAW — Processes RAW files with lens corrections and noise reduction before importing into your editor.
- Lightroom Classic sliders — In the Detail panel, Luminance noise reduction at 30 to 50 handles moderate noise. Color noise reduction at 25 (default) handles chroma noise effectively.
Noise Reduction Tips
- Reduce luminance noise conservatively. Over-applying it creates a waxy, plastic look that is worse than the noise itself.
- Always view at 100% zoom when adjusting noise reduction. The preview image can look fine, but detail loss becomes visible at actual pixels.
- Apply sharpening after noise reduction to recover perceived detail.
- Convert high-ISO images to black and white. Noise in monochrome resembles film grain and is far less objectionable than color noise.
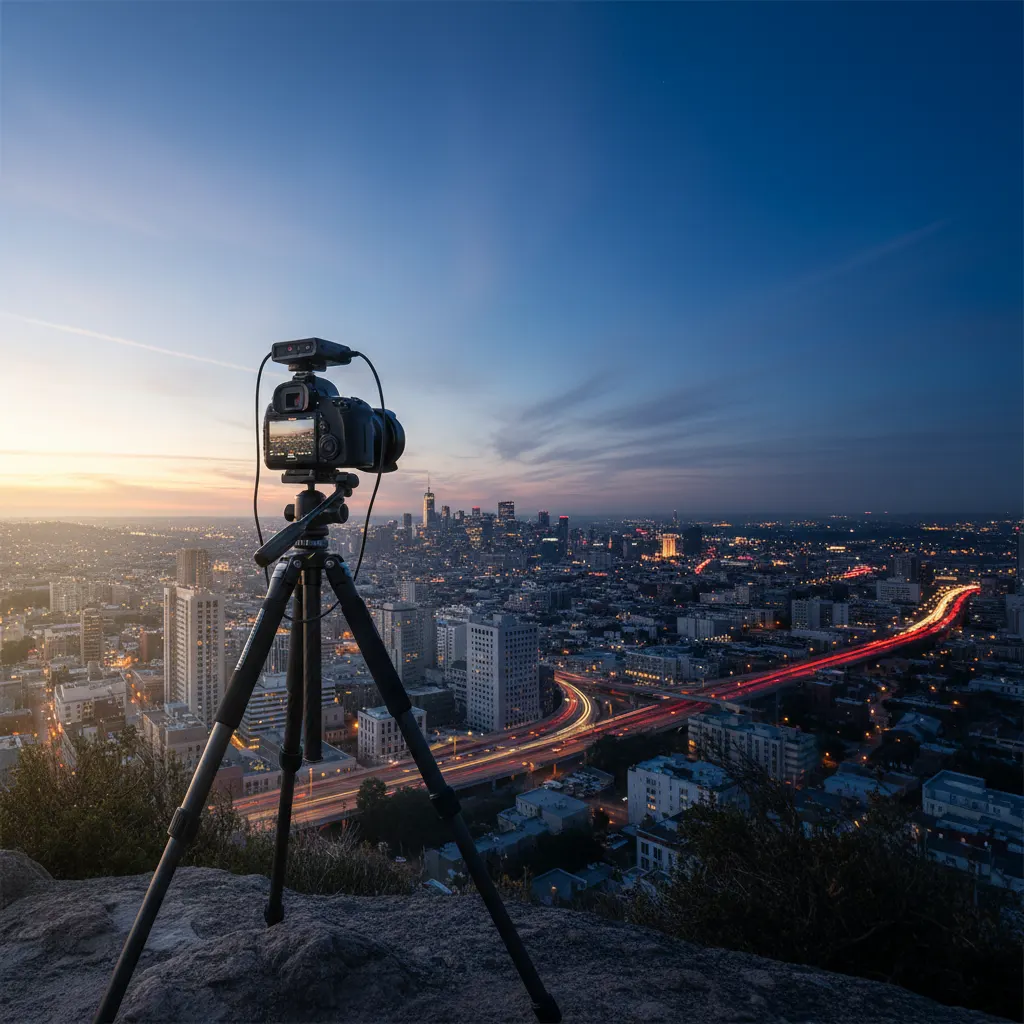
Use a Tripod When You Can
For static subjects — cityscapes, architecture, interiors, and night sky photography — a tripod solves the low-light problem entirely. With a tripod, you can use ISO 100 and any shutter speed you want, producing perfectly clean images regardless of how dark the scene is.
A compact travel tripod that fits in a bag removes the excuse of not having one available. Even a small tabletop tripod or a bean bag can provide enough stability for slow shutter speeds.
Quick Reference: Low-Light Settings
| Situation | Aperture | Shutter Speed | ISO |
|---|---|---|---|
| Restaurant dinner | f/1.8 | 1/60s | 1600 to 3200 |
| Concert | f/2.8 | 1/125s | 3200 to 6400 |
| City street at night | f/1.8 | 1/60s | 1600 to 3200 |
| Indoor sports | f/2.8 | 1/500s | 6400 to 12800 |
| Museum/gallery | f/2.8 | 1/30s | 1600 to 3200 |
| Candlelit scene | f/1.4 | 1/30s | 1600 to 3200 |
These are starting points. Adjust based on your specific camera, lens, and the available light.
Real-World Tips from Experienced Low-Light Photographers
Expose to the right (ETTR). In low light, slightly overexposing the image (pushing the histogram to the right without clipping highlights) captures more data in the shadow regions, which reduces noise when you bring the exposure down in post-processing. This technique works best when shooting RAW and is standard practice among concert and event photographers.
Shoot RAW, always. JPEG compression bakes in noise reduction and white balance, both of which are difficult to fix later. RAW files from cameras like the Sony A7 IV or Nikon Z6 III retain all sensor data, giving you far more latitude to correct exposure, white balance, and noise in Lightroom or Capture One. In low light, this flexibility is essential.
Use spot metering on your subject. Evaluative or matrix metering reads the entire scene, which often includes large dark areas that trick the camera into overexposing. Switching to spot metering and placing the point on your subject — a singer’s face on stage, a friend’s face in a restaurant — gives you an accurate reading for the part of the image that matters.
Embrace monochrome. High-ISO color noise (the red and green speckles) is visually distracting, but when you convert to black and white, noise transforms into something that resembles classic film grain. Many street photographers deliberately shoot at ISO 6400 or higher and convert to monochrome, producing images with a gritty, cinematic feel reminiscent of Tri-X 400 pushed to 1600.
Consider a second body. Working professionals who frequently shoot in low light often carry two camera bodies — one with a wide fast prime (35mm f/1.4) and one with a short telephoto (85mm f/1.8). Swapping lenses in the dark risks dust on the sensor and missed moments. Two bodies eliminate that problem.
Common Mistakes to Avoid
Using flash when the venue prohibits it. Museums, churches, theaters, and many concert venues explicitly ban flash. Beyond the rules, flash at these events disrupts performers and other attendees. Mastering no-flash technique is not just a creative choice — it is often a requirement.
Setting minimum shutter speed too slow for moving subjects. Auto ISO with a minimum shutter speed of 1/30s works for static scenes but produces motion blur on people who are talking, gesturing, or dancing. At events, set the minimum to 1/125s or faster. Accept the higher ISO — a sharp image at ISO 6400 is better than a blurred one at ISO 1600.
Forgetting to disable Auto ISO when switching to a tripod. On a tripod you can use ISO 100 and any shutter speed. If Auto ISO is still active, the camera may push ISO to 3200 while using a fast shutter speed — the opposite of what you want. Switch to full Manual and set ISO 100 manually.
Over-processing noise reduction. Aggressive luminance noise reduction destroys fine detail, producing a waxy, artificial look. Apply noise reduction at 100 percent zoom and stop when the grain is acceptable rather than invisible. A little grain is natural. Plastic skin tones are not.
Ignoring white balance in mixed artificial light. Restaurants and venues often combine tungsten, fluorescent, and LED lighting in the same room. Auto white balance handles this reasonably well, but shooting RAW gives you the option to fine-tune each image. Set a custom Kelvin value (around 3200K for tungsten-heavy venues) or use a gray card for reference.
Frequently Asked Questions
What is the best camera for low-light photography without flash? Full-frame mirrorless cameras offer the best low-light performance due to their larger sensor area. The Sony A7S III was designed specifically for low-light and video work, with a usable ISO range up to 51200 and beyond. The Nikon Z6 III and Canon EOS R6 Mark II are excellent all-rounders that perform very well up to ISO 12800. If budget is a concern, the Sony A7C II offers full-frame low-light capability in a compact body. For more affordable options, see our guide to the best mirrorless cameras for beginners. For APS-C, the Fujifilm X-T5 delivers impressive results up to ISO 6400.
Can image stabilization replace a fast lens in low light? Stabilization helps with camera shake but does not freeze subject motion. If you are photographing a static building or landscape, IBIS (in-body image stabilization) on cameras like the OM System OM-1 Mark II (up to 8.5 stops) can let you shoot at shutter speeds as slow as 1/2s handheld. But for people, animals, or anything that moves, you still need a fast shutter speed, which means you still need a wide aperture and high ISO. Stabilization and fast lenses solve different problems — ideally you want both.
How do I photograph a concert without flash? Use a fast lens (f/1.4 to f/2.8), set your camera to Aperture Priority with the lens wide open, enable Auto ISO with a maximum of 6400 to 12800, and set the minimum shutter speed to 1/160s to freeze performers’ movements. Shoot in continuous burst mode during dynamic moments. Use spot metering aimed at the performer’s face to avoid being fooled by dark backgrounds or bright stage lights. Shoot RAW to handle the unpredictable color casts from stage lighting in post-processing.
The Best Low-Light Photo Is the One You Take
Do not let fear of noise or blur prevent you from pressing the shutter. A grainy, slightly soft photo of a meaningful moment is infinitely better than no photo at all. Modern cameras and software handle noise better every year. Shoot confidently, push your ISO when needed, and clean up in post. The image matters more than the pixel quality.
You might also like
How to Photograph Pets and Animals Like a Pro
Get sharp, expressive pet photos with tips on eye-level shooting, burst mode, lighting, action shots, and patience techniques.
How to Shoot Silhouettes: A Step-by-Step Guide
Master silhouette photography with backlighting techniques, exposure metering tips, subject selection, and creative composition ideas.
Time-Lapse Photography Tutorial: From Setup to Final Video
Learn how to create stunning time-lapse videos with the right intervalometer setup, camera settings, post-processing workflow, and gear.