How to Create Beautiful Bokeh in Your Photos
Master the art of bokeh photography with practical tips on aperture settings, lens choice, distance ratios, and creative light sources.
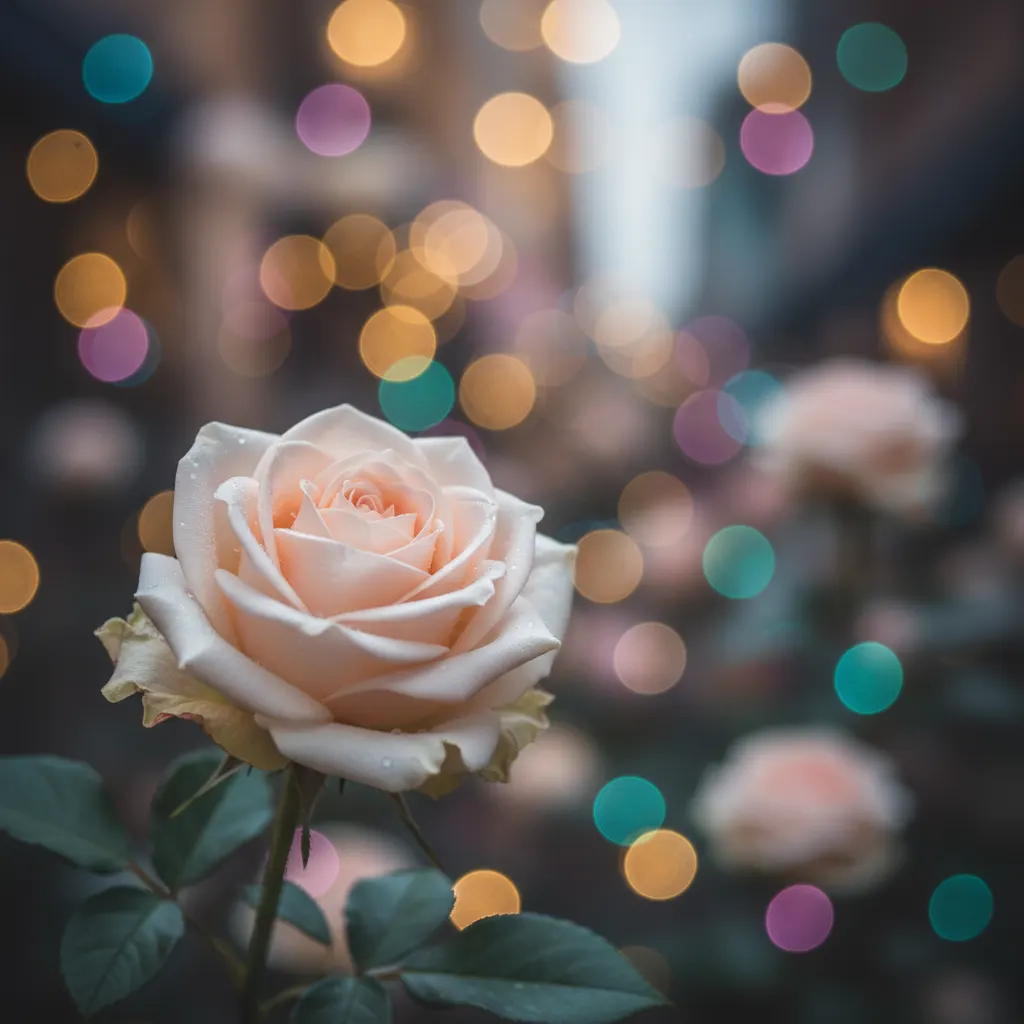
Bokeh refers to the aesthetic quality of the out-of-focus areas in a photograph. The word comes from the Japanese term “boke,” meaning blur or haze. When done well, bokeh transforms distracting backgrounds into smooth, creamy washes of color punctuated by soft, glowing orbs of light.
This guide covers everything you need to know to create stunning bokeh in your images, from camera settings to lens selection and creative techniques.
Understanding What Creates Bokeh
Bokeh is a direct result of shallow depth of field. When your plane of focus is narrow, everything outside that plane becomes progressively blurred. The quality of that blur depends on several factors: your lens design, aperture shape, and the distance relationships between your camera, subject, and background.
Not all blur is equal. Some lenses produce smooth, rounded bokeh circles while others create harsh, outlined discs. This difference comes down to optical design and the shape of the aperture blades.
Aperture Settings for Maximum Bokeh
The single most important setting for bokeh is your aperture. Wider apertures (lower f-numbers) create shallower depth of field and more pronounced bokeh. If you need a refresher on how aperture affects your images, read our guide on understanding aperture, shutter speed, and ISO.
Recommended Aperture Values
- f/1.4 to f/2.0: Maximum bokeh effect. Background elements dissolve into large, soft circles. Ideal for headshots and detail shots.
- f/2.8: Strong bokeh with slightly more background context. Works well for half-body portraits.
- f/4.0: Moderate bokeh. Background is blurred but still somewhat recognizable. Good for environmental portraits where you want some sense of place.
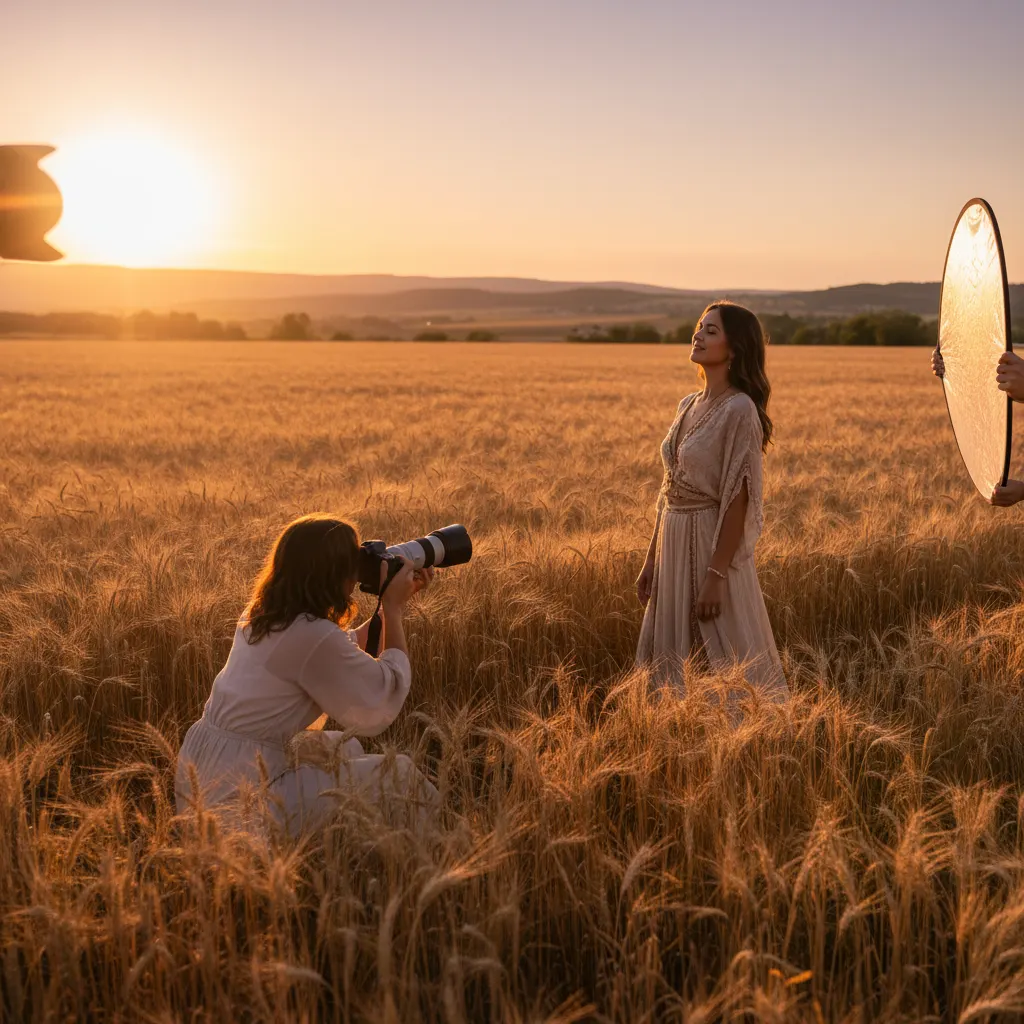
Shoot in Aperture Priority mode (A or Av) so you can control the f-stop while letting the camera handle shutter speed. For even more control, switch to full manual mode on your camera so you can dial in both aperture and shutter speed independently. Keep an eye on your shutter speed to avoid motion blur, especially in lower light.
Choosing the Right Lens
Your lens choice has a dramatic impact on bokeh quality and intensity. Two characteristics matter most: maximum aperture and focal length.
Best Lens Types for Bokeh
50mm f/1.8 or f/1.4: The classic “nifty fifty” is affordable and produces excellent bokeh. The 50mm f/1.8 is often the cheapest way to get into bokeh photography, typically costing under $250.
85mm f/1.8 or f/1.4: Many photographers consider this the ideal portrait and bokeh lens — it also appears in our list of the best camera lenses for portraits. The longer focal length compresses the background and amplifies the blur effect.
70-200mm f/2.8: At 200mm and f/2.8, this zoom produces remarkably smooth bokeh despite not having the widest aperture. The long focal length compensates.
135mm f/2.0: A favorite among portrait specialists. The combination of focal length and wide aperture creates extraordinarily smooth background separation.
What About Kit Lenses?
An 18-55mm f/3.5-5.6 kit lens can produce some bokeh, but it will be limited. Zoom to 55mm, open the aperture to f/5.6, and get as close to your subject as possible while placing the background far away. The results will not match a fast prime, but you can still practice the technique.
The Distance Ratio: The Secret to Better Bokeh
Many beginners focus only on aperture and overlook the most powerful variable: the distance ratio between camera, subject, and background.
Here is the rule: the closer your subject is to the camera and the farther the background is from the subject, the stronger the bokeh.
Practical Example
Imagine photographing a person standing in front of a brick wall.
- Scenario A: Subject is 2 meters from the wall, you are 3 meters from the subject. Bokeh is minimal even at f/1.8.
- Scenario B: Subject is 15 meters from the wall, you are 3 meters from the subject. The wall melts into a smooth, colorful blur at f/1.8.
The background distance matters far more than most people realize. When scouting locations, always look for spots where you can place your subject well away from background elements.
Bokeh Shapes and Aperture Blades
The shape of your bokeh circles is determined by the number and curvature of your lens aperture blades.
- 7 blades: Produces heptagonal bokeh shapes when stopped down slightly.
- 9 blades (rounded): Creates rounder, more pleasing bokeh circles across a wider range of apertures.
- 11 blades: Found in some premium lenses, produces very round bokeh.
At maximum aperture, bokeh circles are always round regardless of blade count because the aperture is fully open. The blade shape only becomes visible when you stop down to f/2.8 or narrower.
Some photographers intentionally use DIY bokeh shape filters, cutting shapes like hearts or stars into black card stock placed over the lens front. This reshapes every bokeh circle into that custom form.
Best Light Sources for Bokeh
Not all backgrounds produce equally attractive bokeh. Point light sources create the most visible and appealing bokeh circles.

Top Bokeh-Friendly Backgrounds
- City lights at night: Street lamps, car headlights, and neon signs create colorful, varied bokeh.
- String lights or fairy lights: Inexpensive and controllable. Hang them behind your subject for instant bokeh.
- Sunlight through leaves: Dappled light filtering through trees creates organic, natural bokeh patterns.
- Water reflections: Sunlight glinting off water produces scattered, sparkling bokeh.
- Holiday decorations: Christmas tree lights are a classic bokeh background.
Avoid backgrounds that are uniformly lit with no variation. A plain, evenly lit wall will just become a flat wash of color rather than interesting bokeh shapes.
Camera Settings Checklist
Here is a quick-reference setup for shooting bokeh-heavy images:
- Mode: Aperture Priority (A/Av) or Manual (M)
- Aperture: f/1.4 to f/2.8 (as wide as your lens allows)
- ISO: 100-400 outdoors, 800-3200 indoors or at night
- Focus mode: Single-point AF, placed on the subject’s nearest eye for portraits
- Metering: Spot or center-weighted, metered on the subject
- Focal length: 50mm or longer for the strongest effect
Common Bokeh Mistakes to Avoid
Focusing on the wrong element. With razor-thin depth of field at f/1.4, missing focus by even a few centimeters puts your subject out of the sharp zone. Use single-point AF and place it precisely.
Subject too far from camera. Getting closer to your subject increases the bokeh effect. If you are standing 10 meters away, even f/1.4 will not produce dramatic blur.
Background too close to subject. This is the most common mistake. Move your subject away from walls, fences, and other background elements.
Shooting at wide angle. A 24mm lens at f/2.8 produces far less bokeh than an 85mm lens at f/2.8. Use longer focal lengths for stronger background separation.
Recommended Camera Settings Table
Here is a quick-reference table for different bokeh shooting scenarios:
| Scenario | Lens | Aperture | ISO | Shutter Speed | Focus Mode |
|---|---|---|---|---|---|
| Outdoor portrait, golden hour | 85mm f/1.4 (e.g., Sony FE 85mm f/1.4 GM) | f/1.4 – f/2.0 | 100 – 200 | 1/500s – 1/1000s | AF-S, single point on eye |
| Indoor portrait with fairy lights | 50mm f/1.8 (e.g., Canon RF 50mm f/1.8 STM) | f/1.8 – f/2.0 | 800 – 1600 | 1/125s – 1/250s | AF-S, single point on eye |
| Night city bokeh behind subject | 135mm f/2.0 (e.g., Sigma 135mm f/1.8 Art) | f/1.8 – f/2.0 | 1600 – 3200 | 1/200s – 1/500s | AF-S, single point |
| Close-up product with background blur | 50mm f/1.4 (e.g., Nikon Z 50mm f/1.4) | f/1.4 – f/2.0 | 100 – 400 | 1/60s – 1/250s | AF-S, single point on product |
| Holiday lights bokeh portrait | 70-200mm f/2.8 at 200mm (e.g., Tamron 70-180mm f/2.8 Di III) | f/2.8 | 1600 – 3200 | 1/200s – 1/400s | AF-S, single point on eye |
Real-World Tips from Experienced Photographers
Shoot wide open first, then stop down. When you arrive at a scene, take your first test shots at maximum aperture. Review the bokeh quality on your LCD. If the bokeh circles show harsh edges or “onion ring” patterns (common with some aspherical lens elements), stop down by half a stop. Lenses like the Canon RF 50mm f/1.2L and Sony FE 85mm f/1.4 GM are specifically engineered to minimize these artifacts, but even budget lenses like the Canon EF 50mm f/1.8 STM produce pleasing bokeh at their maximum aperture.
Watch for busy bokeh. Not all out-of-focus areas are equal. Tree branches, fences, and patterned fabrics can create distracting, “nervous” bokeh even at f/1.4. Before shooting, glance at the background through the viewfinder and look for elements that might create visual clutter. Shifting your position by just a meter to the left or right often eliminates problem areas entirely.
Use bokeh to guide the viewer’s eye. Understanding photo composition fundamentals helps you place subjects where the background bokeh creates a natural frame. Experienced portrait photographers use this approach deliberately. A cluster of warm, golden bokeh circles above and to the side of a subject draws the viewer directly to the face. Plan your compositions so the out-of-focus elements support rather than compete with the in-focus subject.
Foreground bokeh adds depth. Shooting through a blurred foreground element, such as flowers, leaves, or even a gauzy curtain, creates layers in your image. This technique pairs especially well with macro photography, where extremely shallow depth of field naturally produces rich bokeh around tiny subjects. Position something semi-transparent between your lens and the subject at close range. At f/1.4 or f/1.8, this foreground element dissolves into a soft wash of color that frames your subject beautifully. This technique is widely used in wedding and engagement photography for a romantic, dreamlike feel.
Practice Exercise
Find a subject like a coffee cup or a small figurine. Place it on a table with string lights or a window with city views behind it. Set your lens to its longest focal length and widest aperture. Take three shots: one with the background 1 meter away, one at 3 meters, and one at 5 meters or more. Compare the bokeh in each image and you will immediately see how distance transforms the quality of your blur.
Bokeh is one of those skills where understanding the physics gives you complete creative control. Master the relationship between aperture, focal length, and distance, and you can create that dreamy background blur in almost any shooting situation. Try combining beautiful bokeh with warm light during sunset photography for especially striking results.
Frequently Asked Questions
What is the best aperture for bokeh? The best aperture for bokeh is the widest your lens allows, typically f/1.4 or f/1.8 on a fast prime lens. Wider apertures create a shallower depth of field, which produces larger, softer out-of-focus circles in the background. However, aperture alone does not determine bokeh quality. The distance between your subject and the background matters just as much. A subject standing 15 meters from the background at f/2.8 can produce more bokeh than a subject 1 meter from the background at f/1.4.
Can you get good bokeh with a kit lens? Yes, but with limitations. A standard 18-55mm f/3.5-5.6 kit lens can produce noticeable bokeh if you zoom to 55mm, open the aperture to f/5.6, stand close to your subject, and place the background as far away as possible. The results will not match a dedicated portrait prime like an 85mm f/1.4, but you can still achieve pleasing background separation. If you want to upgrade on a budget, the Canon EF 50mm f/1.8 STM (around $125) or Nikon Z 40mm f/2 (around $250) are affordable options that dramatically improve bokeh quality.
Why does my bokeh look like hexagons instead of circles? Hexagonal or polygonal bokeh shapes appear when you stop down from your lens’s maximum aperture. At wide open (e.g., f/1.4 or f/1.8), the aperture blades form a fully circular opening, producing round bokeh. When you stop down to f/4 or f/5.6, the blade shape becomes visible in the out-of-focus highlights. Lenses with more rounded aperture blades (9 or 11 blades) maintain rounder bokeh even when stopped down. If round bokeh is important to you, check the aperture blade count and shape when choosing a lens. The Sony FE 85mm f/1.4 GM, for example, uses 11 rounded blades specifically for smooth, circular bokeh at all aperture settings.
You might also like
Mastering Golden Hour Photography
Learn how to make the most of golden hour light for portraits and landscapes with practical camera settings and composition tips.
How to Photograph Pets and Animals Like a Pro
Get sharp, expressive pet photos with tips on eye-level shooting, burst mode, lighting, action shots, and patience techniques.

How to Shoot Silhouettes: A Step-by-Step Guide
Master silhouette photography with backlighting techniques, exposure metering tips, subject selection, and creative composition ideas.