How to Take Sharp Photos Every Time
Eliminate blurry shots with proven focus techniques, shutter speed rules, tripod use, and back-button focus for consistently sharp images.

Blurry photos are the number one frustration for photographers at every level. You compose the perfect shot, the moment is right, you press the shutter, and the result is soft. Sometimes the cause is obvious. Often it is not.
Sharpness problems fall into three categories: missed focus, camera shake, and subject motion. This guide addresses all three with practical techniques you can apply immediately.
The Reciprocal Rule for Shutter Speed
Camera shake is the most common cause of soft images when shooting handheld. Your hands introduce tiny vibrations that become visible blur at slower shutter speeds.
The reciprocal rule gives you a reliable minimum shutter speed: use a shutter speed that is at least 1 over your focal length.
- Shooting at 50mm? Use 1/50s or faster.
- Shooting at 200mm? Use 1/200s or faster.
- Shooting at 24mm? Use 1/25s or faster.
Crop Sensor Adjustment
If you are using an APS-C camera, multiply by your crop factor (typically 1.5 for Nikon/Sony, 1.6 for Canon). A 200mm lens on an APS-C body has an effective focal length of 300mm, so you need 1/300s or faster.
When to Break the Rule
Image stabilization (IS, VR, OIS, or IBIS) lets you shoot 3 to 5 stops slower than the reciprocal rule suggests. A lens-stabilized 200mm setup might let you get sharp results at 1/30s. However, stabilization only compensates for camera shake, not subject movement. A moving person still needs a fast shutter speed.
Mastering Autofocus for Precision
Modern cameras have sophisticated autofocus systems, but they only work well when you use them correctly.
Single-Point AF vs Zone AF
Single-point AF lets you place the focus point exactly where you want it. This is the most reliable method for stationary subjects. Place the point on your subject’s eye for portraits, or on the key element of a landscape.
Zone AF or area AF uses a cluster of focus points. This works better for moving subjects because the camera can track within the zone even if the subject shifts position slightly.
Wide/auto area AF lets the camera decide what to focus on. This is convenient for snapshots but unreliable for precise work. The camera often focuses on the nearest or most contrasty element, which may not be your intended subject.
Continuous vs Single AF
- AF-S (Single): The camera locks focus once and holds it. Use this for stationary subjects like landscapes, architecture, and posed portraits.
- AF-C (Continuous): The camera continuously adjusts focus as long as you hold the shutter button half-pressed. Essential for moving subjects like sports, wildlife, and children.
Using AF-S for a moving subject is a guaranteed way to get soft images. The subject moves between the moment you lock focus and the moment the shutter fires. For more on capturing action, see our guide on how to photograph moving subjects.
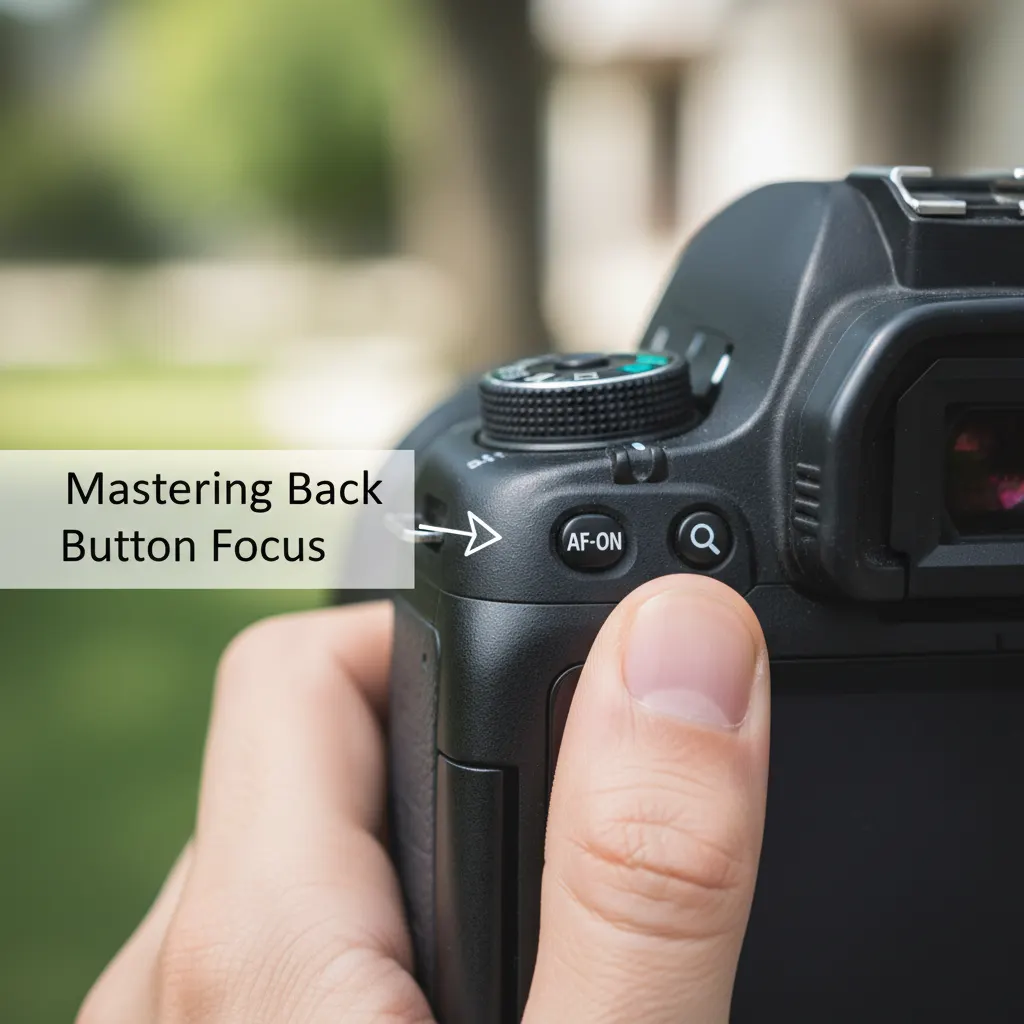
Back-Button Focus: A Game Changer
By default, pressing the shutter button halfway activates autofocus. Back-button focus separates these functions: a dedicated button on the back of the camera handles focus, and the shutter button only fires the shutter.
Why This Matters
With back-button focus, you can:
- Focus and recompose freely. Press the back button to lock focus, then move the camera to compose without the focus point shifting.
- Switch between single and continuous focus instantly. Press and release for single focus lock. Press and hold for continuous tracking. No menu diving required.
- Avoid refocusing when you do not need to. If your subject has not moved, do not press the focus button again. The focus stays where you set it.
How to Set It Up
The exact menu path varies by brand:
- Canon: Custom Functions > Custom Controls > AF-ON button > Metering and AF start. Then disable AF from the shutter button.
- Nikon: Custom Setting Menu > Autofocus > AF activation > AF-ON only.
- Sony: Menu > Custom Key > AF-ON > AF On. Then set Shutter > Half Press to “no function” for AF.
It takes about a week of shooting to build the new muscle memory. After that, most photographers never go back.
Tripod Technique That Actually Works
Owning a tripod is not enough — and choosing the right one matters. See our guide to the best tripods for photography for recommendations at every budget. Poor tripod technique can actually introduce more vibration than careful handheld shooting.
Tripod Best Practices
Extend the thickest leg sections first. The lower, thinner sections flex more. Only extend them when you need the extra height.
Do not raise the center column unless necessary. The center column is the least stable part of a tripod. Keep it down for maximum rigidity.
Hang weight from the center hook. Many tripods have a hook under the center column. Hanging your camera bag from it adds mass and reduces vibration, especially in wind.
Use a remote shutter release or the 2-second timer. Pressing the shutter button with your finger introduces vibration. A wireless remote, cable release, or the camera’s built-in timer eliminates this.
Turn off image stabilization on a tripod. This sounds counterintuitive, but stabilization systems can actually create micro-vibrations when the camera is already stable. Most manufacturers recommend disabling IS/VR when tripod-mounted.
Mirror Lock-Up and Electronic Shutter
On DSLR cameras, the mirror flipping up before exposure creates a small vibration called “mirror slap.” This is most noticeable at shutter speeds between 1/15s and 1 second.
Mirror lock-up (MLU) flips the mirror up with the first shutter press, then fires the shutter on the second press, allowing vibrations to settle between actions.
Mirrorless cameras do not have this problem since they have no mirror. However, mechanical shutter actuation can still cause slight vibration. Using electronic first curtain shutter (EFCS) or full electronic shutter eliminates this entirely.
Optimizing Aperture for Sharpness
Every lens has a “sweet spot” aperture where it produces its sharpest results. This is typically 2 to 3 stops narrower than the maximum aperture. If you need a refresher on how aperture interacts with shutter speed and ISO, see our guide on understanding aperture, shutter speed, and ISO.
- A 50mm f/1.4 lens is usually sharpest around f/4 to f/5.6.
- A 24-70mm f/2.8 is typically sharpest around f/5.6 to f/8.
- Kit lenses often peak around f/8.
Avoid very narrow apertures like f/16 or f/22 unless you specifically need the depth of field. Diffraction softens images at these small openings, and the effect is more pronounced on crop-sensor cameras.
ISO and Sharpness
High ISO values introduce noise, and aggressive noise reduction in post-processing can smear fine detail, reducing perceived sharpness.
Keep ISO as low as practical, but never sacrifice shutter speed for a lower ISO. A slightly noisy sharp image is always better than a clean blurry one. For situations where high ISO is unavoidable, our guide on how to shoot in low light without flash covers techniques for managing noise while maintaining sharpness.
Modern cameras handle ISO remarkably well. Most APS-C sensors are clean up to ISO 3200, and full-frame sensors often look excellent at ISO 6400 or higher.
Focus Calibration
If your images are consistently front-focused or back-focused with a particular lens, your lens may need AF fine-tune calibration.
Most mid-range and professional DSLRs offer AF micro-adjustment in the menu. You can dial in a correction value for each lens. Use a focus calibration chart (like the LensAlign or a DIY ruler method) to determine the correct offset.
Mirrorless cameras using on-sensor phase detection generally do not need this adjustment since focus is measured directly on the imaging plane.
Recommended Camera Settings Table
Here are specific settings for common scenarios where sharpness is critical:
| Scenario | Aperture | Shutter Speed | ISO | Focus Mode | Stabilization |
|---|---|---|---|---|---|
| Handheld street photography (50mm) | f/5.6 – f/8 | 1/125s or faster | Auto (max 3200) | AF-C with zone AF | On (lens or IBIS) |
| Landscape on tripod (24mm) | f/8 – f/11 | 1/4s – 2s | 100 | AF-S, single point on hyperfocal | Off |
| Sports / action (200mm) | f/2.8 – f/4 | 1/1000s or faster | Auto (max 6400) | AF-C with wide tracking | On |
| Portrait handheld (85mm) | f/2.0 – f/4 | 1/200s or faster | 100 – 800 | AF-S, single point on near eye | On |
| Macro close-up on tripod | f/8 – f/11 | 1/4s – 1s | 100 – 200 | Manual focus with live view magnification | Off |
| Low-light event (35mm) | f/2.0 – f/2.8 | 1/60s – 1/125s | 1600 – 6400 | AF-C with zone AF | On |
Real-World Tips from Experienced Photographers
Focus on technique before gear. Many photographers blame soft images on their lens quality when the real issue is camera shake or missed focus. If you are shopping for a capable camera on a budget, our roundup of the best cameras under $500 highlights models that deliver excellent sharpness. A $200 lens used with proper technique (correct shutter speed, stable stance, precise focus point placement) will outperform a $2,000 lens used carelessly. Before upgrading gear, spend a week consciously applying the reciprocal rule and using single-point AF for every shot.
The photographer’s stance matters. Experienced photojournalists and wildlife photographers adopt a stable shooting posture: feet shoulder-width apart, elbows tucked into the body, camera pressed firmly against the face. Some tuck their left elbow against their chest and rest the lens on their left palm. This human tripod technique can give you 1 to 2 extra stops of stability compared to holding the camera at arm’s length.
Use focus peaking on mirrorless cameras. Cameras like the Sony A7 IV, Nikon Z6 III, and Canon R6 Mark III offer focus peaking, which highlights in-focus edges with a colored overlay in the viewfinder. This is invaluable for manual focus shooting, especially with adapted vintage lenses. Set the peaking color to red for easy visibility and the sensitivity to medium for the best balance between precision and usability.
Check sharpness on a computer, not the camera LCD. The camera’s rear screen is too small and too low-resolution to judge critical sharpness. What looks sharp on a 3-inch LCD might be noticeably soft at 100% on a monitor. During important shoots, periodically review images on a laptop tethered to the camera, or at minimum zoom to 100% on the camera screen and check focus on your subject’s eyes.
Quick Sharpness Checklist
Before every shot, run through this mental checklist:
- Shutter speed: Is it fast enough for my focal length and subject movement?
- Focus point: Is it placed precisely on my subject?
- Focus mode: AF-S for still, AF-C for moving subjects?
- Aperture: Am I in the lens sweet spot, or is there a reason to shoot wide open?
- Stabilization: On for handheld, off for tripod?
- ISO: Low enough for clean files, high enough for adequate shutter speed?
Sharpness is not about one magic setting. It is the result of getting several small things right simultaneously. Pairing these techniques with full manual mode control on your camera gives you the best chance of nailing every shot. Build these habits into your shooting routine and soft images will become rare exceptions rather than frequent disappointments.
Frequently Asked Questions
What shutter speed do I need for sharp handheld photos? As a starting point, use the reciprocal rule: set your shutter speed to at least 1/focal length. For a 50mm lens, that means 1/50s or faster. For a 200mm lens, use 1/200s or faster. On crop-sensor cameras (APS-C), multiply the focal length by 1.5 first, so a 200mm lens needs 1/300s. Image stabilization (IBIS or lens-based IS) can let you shoot 3 to 5 stops slower, but it only compensates for camera shake, not subject movement. A moving person still needs at least 1/250s to freeze motion regardless of stabilization.
Should I use autofocus or manual focus for the sharpest results? For most situations, autofocus is faster and more accurate than manual focus, especially with modern mirrorless cameras like the Sony A7R V or Canon R5 Mark II that use AI-powered subject detection. Use single-point AF-S for stationary subjects and AF-C with tracking for moving subjects. Manual focus is better in specific cases: macro photography where precise focus plane control is critical, astrophotography where AF struggles in darkness, and when using adapted vintage lenses. When focusing manually, use live view magnification (10x zoom) or focus peaking for maximum precision.
Why are my photos sharp on the camera screen but blurry on my computer? This happens because the camera LCD is small (typically 3 to 3.2 inches) and does not show fine detail. Slight camera shake or missed focus that is invisible on the back screen becomes obvious at 100% magnification on a monitor. To catch this in the field, zoom to 100% on your camera’s LCD and check sharpness on the exact focus point. Also ensure you are using the lens’s sweet spot aperture (typically f/5.6 to f/8) rather than shooting wide open, where optical aberrations and razor-thin depth of field make critical focus more difficult.
You might also like
How to Photograph Moving Subjects
Learn to freeze action and capture motion blur with practical shutter speed guides for sports, wildlife, kids, and street photography.

How to Photograph Pets and Animals Like a Pro
Get sharp, expressive pet photos with tips on eye-level shooting, burst mode, lighting, action shots, and patience techniques.

How to Shoot Silhouettes: A Step-by-Step Guide
Master silhouette photography with backlighting techniques, exposure metering tips, subject selection, and creative composition ideas.